 Tweet
Tweet
First of all remove the philip's head screw and the 10mil socket (behind the cover) under the dash this will allow for a lot of space to be opened up under the dash so you can see where there are available spots to mount the mounting bracket. I was originally going to cable tie to the bracket that runs up along near the steering column. In the end we decided against this. There is a spot high behind dash that has a 6mm nut welded to a bracket, we used this to mount the UHF bracket to. On the bracket itself we drilled out a whole in the middle of the bracket to fit the screw.
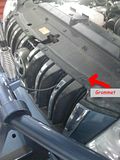
I decided to run the aerial cable straight through the grill, I removed the dozen or so little black grommets to lift the plastic shielding over the grill to get a better layout for the cable. I ran this along the passenger side panel. If you lift the plastic shielding along that passenger side panel you will find some brackets in which i ran the cable through. I then ran it along the back of the engine bay down through the large grommet on the drivers side.
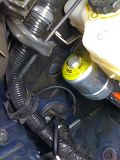
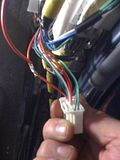
To obtain power to the UHF we took out the kick panel on the drivers side by lifting the covering on the floor and then removing the finger tight plastic screw that holds the panel in place. There we are few spots that were usable to get power. I elected to have permanent power so we used a red cable to connect to. As you can see from the pic we spliced and soldered the cable from the UHF to this point. This I found was the easiest to get to without to much trouble.
I used a few more cable ties to keep it nice and neat under the dash so there are no cables dropping at our feet when we drive.
I used some Velcro to stick both the RJ45 connection and the Hand set . I placed the handset on the down at the drivers left leg.

I decided to run the aerial cable straight through the grill, I removed the dozen or so little black grommets to lift the plastic shielding over the grill to get a better layout for the cable. I ran this along the passenger side panel. If you lift the plastic shielding along that passenger side panel you will find some brackets in which i ran the cable through. I then ran it along the back of the engine bay down through the large grommet on the drivers side.
To obtain power to the UHF we took out the kick panel on the drivers side by lifting the covering on the floor and then removing the finger tight plastic screw that holds the panel in place. There we are few spots that were usable to get power. I elected to have permanent power so we used a red cable to connect to. As you can see from the pic we spliced and soldered the cable from the UHF to this point. This I found was the easiest to get to without to much trouble.
I used a few more cable ties to keep it nice and neat under the dash so there are no cables dropping at our feet when we drive.
I used some Velcro to stick both the RJ45 connection and the Hand set . I placed the handset on the down at the drivers left leg.