 Tweet
Tweet
After establishing that the standard stereo in the 150 series GX was the same as the one in the 120 series (but with added USB interface), and that the GX does not have the features that prevent the Dig Options premium unit from working in the GXL, I decided to go ahead and purchase one.
It arrived this week so I set about installing it on Thursday night.
I started with the reversing camera. Initially I was hoping to locate it on the spare wheel mount the same as the GXL�s but I could not find anywhere that the cable could come through the door skin, and not wanting to drill a hole through the rear door skin I abandoned this idea. One useful, and very annoying, thing I did discover though when I went to take the spare wheel off is that the factory wheel spanner does not fit the aftermarket wheel nuts. Lucky I discovered it now and not by the side of the road somewhere with a flat tyre.
Anyway, the next option was to mount the camera beside the number plate. First task � remove internal trim on the rear door. Much easer said than done. There are three screws/bolts that have to come off first, plus the trim around the door handle/lock and then a bunch of push in clips.
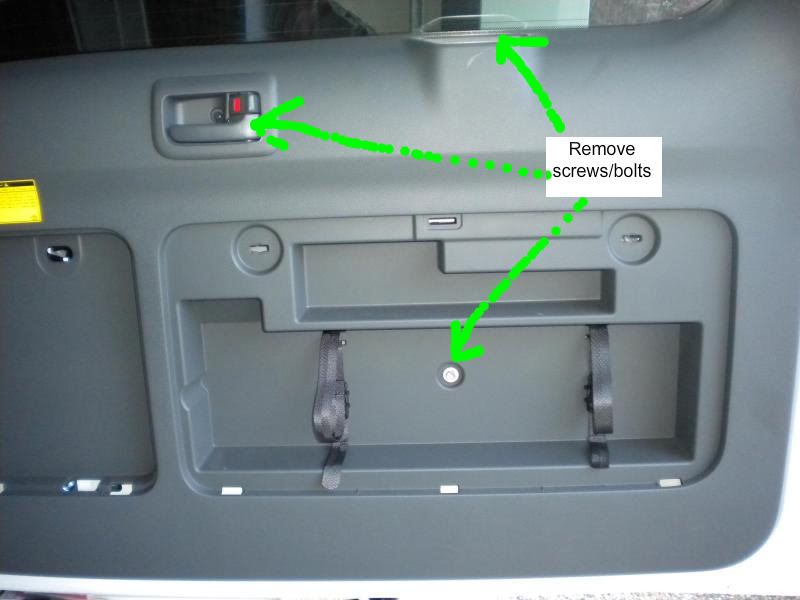
Once I had taken the screws and door lock trim off I tried to pull the door trim off but it would not budge. I ended up having to pull off the trims either side of the window first which allowed me to then get the top clips of the door trim undone and then worked my way around.
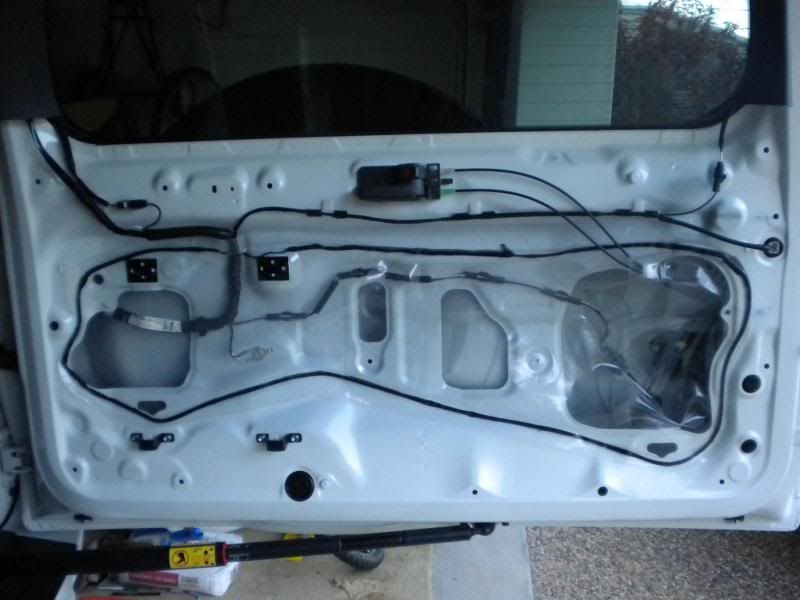
This is what it looks like with the door trim removed.
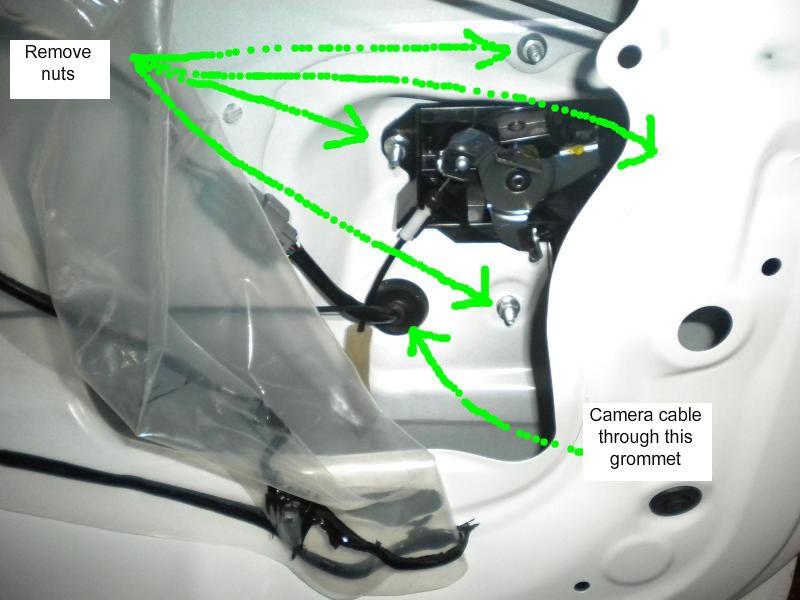
Next item was to work out how to get the cabling into the number plate holder. I decided I would mount the camera beside the right hand number plate lights. To remove the number plate holder (the whole assembly including the lights and handle) you have to remove the nuts off the four silver bolts shown below (there is one but not visible in the picture but it is easy to reach with a socket).
The next photo shows the outside of the door with the number plate holder removed.
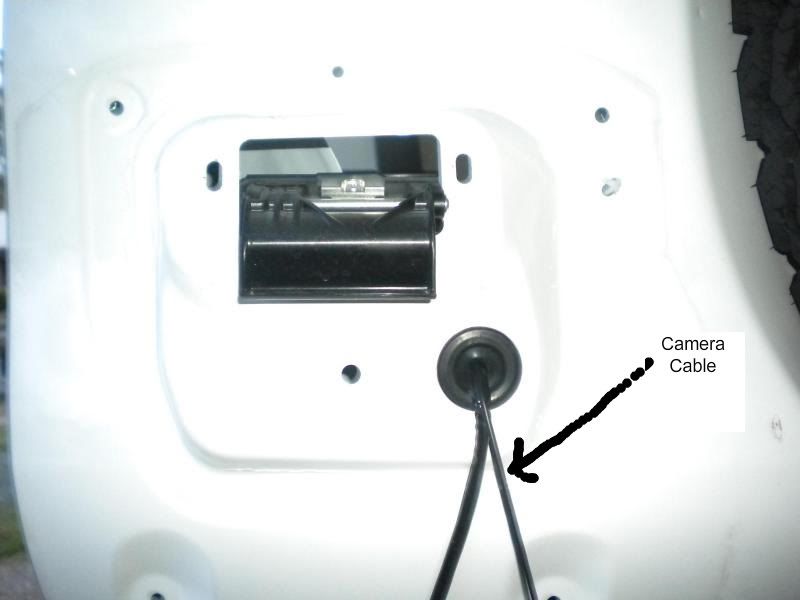
There is a rubber grommet in the door for the number plate lights so I ran the camera cable through that.
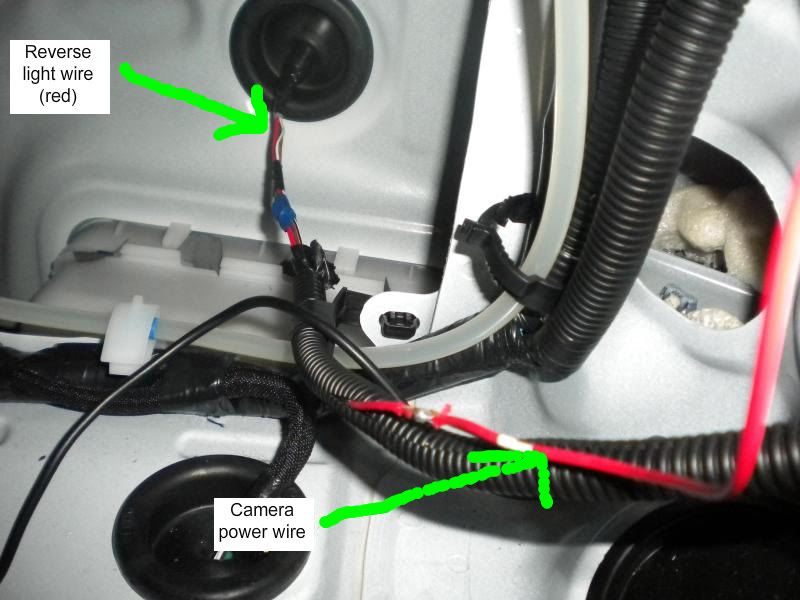
The next job was to find a reverse light wire for power and connect the camera to it. This is where it started to get hard. The wiring for the reverse lights passes through a grommet in the side of the rear quarter panel and then runs up between the inner and outer panel to the light. It took me some time to figure this out as it is not an obvious place for the wire to come from, especially as the wiring loom passes closer to the tail light a little further up the rear pillar. Eventually I found this wire and soldered the camera power wire to it, see pic below.
However, to get access to the wiring in here you have to remove the rear quarter panel trim inside the cargo area and to do that you have to remove the carpet and to do that you have to remove the trim at the front and back of the carpet. There are a few bolts and screws that need to be removed to get the quarter panel trim off � one right at the rear where the little hook for the roller blind on the GXL is, one just behind the second row seats where the roller blind would sit, one into the floor at the wheel arch and then remove the bolt anchoring the second row seat belt. (I thought I took a photo of this but can�t find it). Even then I could not get the quarter panel trim off completely because there seemed to be something in the second row seat tilt lever stopping it from coming off and I had run out of patience trying to find that one so I just had to work with the panel pulled back out of the way but still attached at the front. This whole excercise of getting to and locating the reversing wire probably took me 1 1/2 hours.
Oh, I pulled the camera wiring through the flexible rubber concertina thingy between the rear door and the main vehicle body. I had to make another hole in the grommet on the body to fit it through. Sorry, no photo of this.
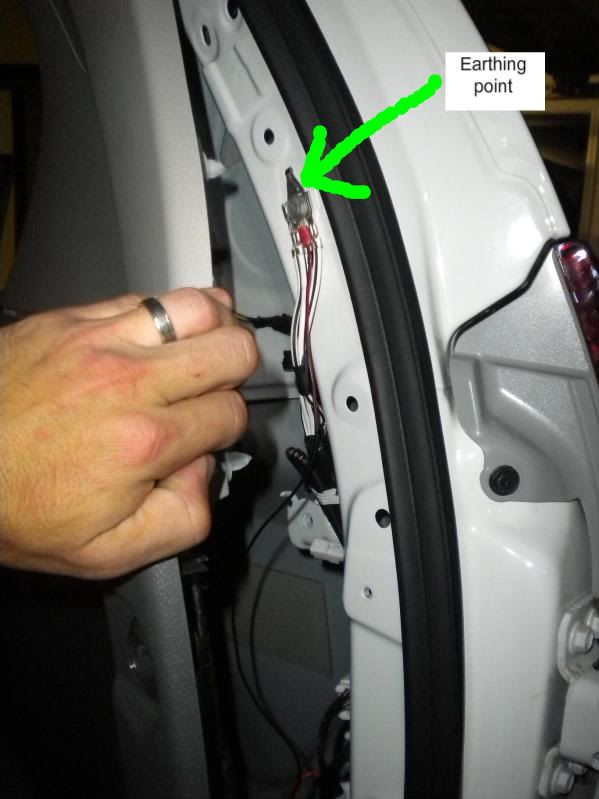
There is a earthing point beneath the trim at the back of the rear quarter panel window (i.e. above the trim that I removed to get to the reverse wire) and I connected the camera earth to this.
Then I ran the camera wiring under the door sill trims up to the dashboard.
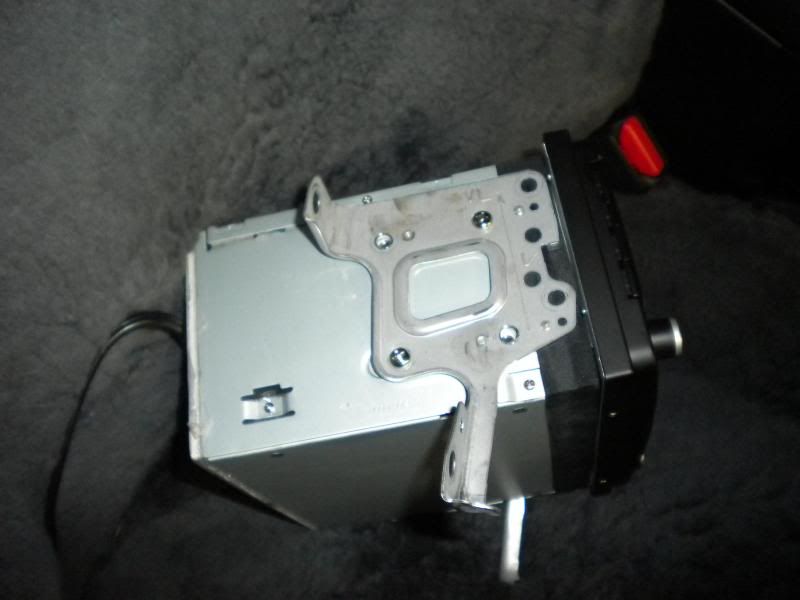
After that effort the the head unit went in easily. I had to locate the two side mounting brackets on the unit as close to the front of the unit as they would go because the facia is thicker than the standard unit. These mounting brackets have a couple of locating lugs on them which I had to flatten down with a hammer.
I have located the GPS receiver on the dash for now sitting on top of the right hand side speaker grill. I ran the cabling across underneath the steering wheel/above the pedals then up the outside of the dash. Ultimately I will probably mount it on top of the snorkel but it was too much effort at the time, and I will see how it goes on the dash first.
I fed the iPod and USB cables through into the glovebox.
The bluetooth microphone is sitting on top of the steering wheel column down where it meets the dashboard. It is not secured yet as it only has an alligator type clip on it. I think I will probably stick it down with a piece of double sided tape.
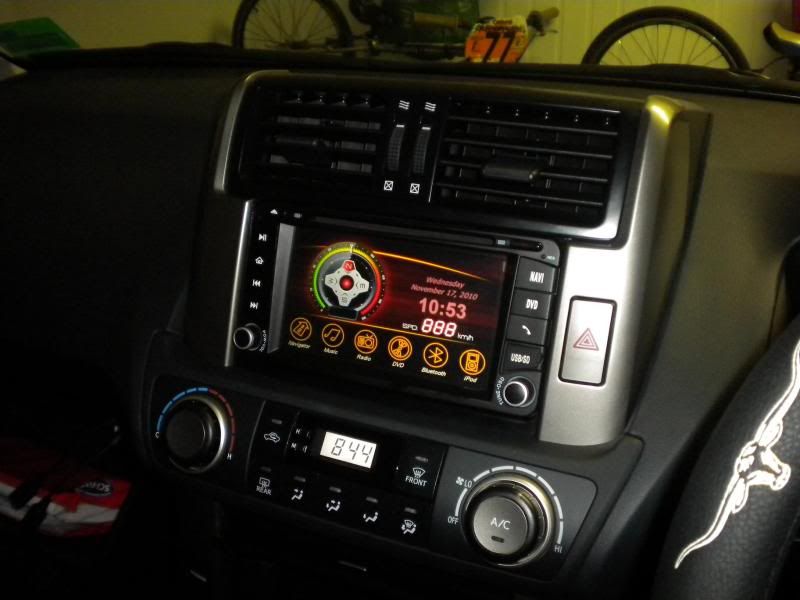
The unit fits seemlessly into the dash. My wife actually commented on how well it fitted and that it looked like a factory unit.
Finished install of the head unit.

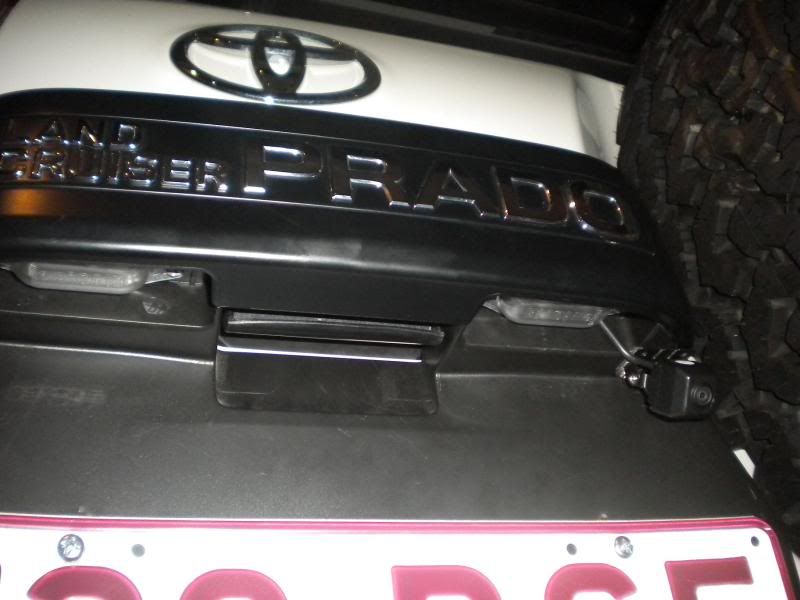
Finished install of the camera.
Ando
It arrived this week so I set about installing it on Thursday night.
I started with the reversing camera. Initially I was hoping to locate it on the spare wheel mount the same as the GXL�s but I could not find anywhere that the cable could come through the door skin, and not wanting to drill a hole through the rear door skin I abandoned this idea. One useful, and very annoying, thing I did discover though when I went to take the spare wheel off is that the factory wheel spanner does not fit the aftermarket wheel nuts. Lucky I discovered it now and not by the side of the road somewhere with a flat tyre.
Anyway, the next option was to mount the camera beside the number plate. First task � remove internal trim on the rear door. Much easer said than done. There are three screws/bolts that have to come off first, plus the trim around the door handle/lock and then a bunch of push in clips.
Once I had taken the screws and door lock trim off I tried to pull the door trim off but it would not budge. I ended up having to pull off the trims either side of the window first which allowed me to then get the top clips of the door trim undone and then worked my way around.
This is what it looks like with the door trim removed.
Next item was to work out how to get the cabling into the number plate holder. I decided I would mount the camera beside the right hand number plate lights. To remove the number plate holder (the whole assembly including the lights and handle) you have to remove the nuts off the four silver bolts shown below (there is one but not visible in the picture but it is easy to reach with a socket).
The next photo shows the outside of the door with the number plate holder removed.
There is a rubber grommet in the door for the number plate lights so I ran the camera cable through that.
The next job was to find a reverse light wire for power and connect the camera to it. This is where it started to get hard. The wiring for the reverse lights passes through a grommet in the side of the rear quarter panel and then runs up between the inner and outer panel to the light. It took me some time to figure this out as it is not an obvious place for the wire to come from, especially as the wiring loom passes closer to the tail light a little further up the rear pillar. Eventually I found this wire and soldered the camera power wire to it, see pic below.
However, to get access to the wiring in here you have to remove the rear quarter panel trim inside the cargo area and to do that you have to remove the carpet and to do that you have to remove the trim at the front and back of the carpet. There are a few bolts and screws that need to be removed to get the quarter panel trim off � one right at the rear where the little hook for the roller blind on the GXL is, one just behind the second row seats where the roller blind would sit, one into the floor at the wheel arch and then remove the bolt anchoring the second row seat belt. (I thought I took a photo of this but can�t find it). Even then I could not get the quarter panel trim off completely because there seemed to be something in the second row seat tilt lever stopping it from coming off and I had run out of patience trying to find that one so I just had to work with the panel pulled back out of the way but still attached at the front. This whole excercise of getting to and locating the reversing wire probably took me 1 1/2 hours.
Oh, I pulled the camera wiring through the flexible rubber concertina thingy between the rear door and the main vehicle body. I had to make another hole in the grommet on the body to fit it through. Sorry, no photo of this.
There is a earthing point beneath the trim at the back of the rear quarter panel window (i.e. above the trim that I removed to get to the reverse wire) and I connected the camera earth to this.
Then I ran the camera wiring under the door sill trims up to the dashboard.
After that effort the the head unit went in easily. I had to locate the two side mounting brackets on the unit as close to the front of the unit as they would go because the facia is thicker than the standard unit. These mounting brackets have a couple of locating lugs on them which I had to flatten down with a hammer.
I have located the GPS receiver on the dash for now sitting on top of the right hand side speaker grill. I ran the cabling across underneath the steering wheel/above the pedals then up the outside of the dash. Ultimately I will probably mount it on top of the snorkel but it was too much effort at the time, and I will see how it goes on the dash first.
I fed the iPod and USB cables through into the glovebox.
The bluetooth microphone is sitting on top of the steering wheel column down where it meets the dashboard. It is not secured yet as it only has an alligator type clip on it. I think I will probably stick it down with a piece of double sided tape.
The unit fits seemlessly into the dash. My wife actually commented on how well it fitted and that it looked like a factory unit.
Finished install of the head unit.
Finished install of the camera.
Ando
Comment