Announcement

Collapse
No announcement yet.

vk3bq's 2012 150 GXL

Collapse
X
 
  • Filter
  • Time
  • Show
Clear All
new posts

  • vk3bq's 2012 150 GXL

    was told quite bluntly not to do anything to this when soccer mum wifey collected it. but its hard to resist.

    getting it ready for a trip to the Kimberly next year, so it needs some minor add ons.

    will pop in the Bits ive added / changed as I get time.

  • #2
    first up - dual battery setup in preparation for 12v to the back for the fridge/ ham radios and trailer connection.

    this consists of (ebay, jaycar and local retailer sourced bits)

    sbi12
    arb tray
    d34 battery
    home made cables. 3AWG (i purchased a crimp tool given i expect to make up other cables for the CT etc into the future)

    earthed to the chassis and also back to the main battery, as no one can decide which is better. i did both..

    next step is to get this spare power to the back of the car!..


    Untitled by asphotos, on Flickr

    Untitled by asphotos, on Flickr

    Untitled by asphotos, on Flickr

    Untitled by asphotos, on Flickr
    Vk3bq
    Junior Member
    Last edited by Vk3bq; 10-10-2012, 07:50 AM.

    Comment


    • #3
      next up, a place to mount a big HF antenna.

      the car does not have a bullbar (and im not sure it ever will), so i discovered this very neat kaymar rear wheel extension/antenna mount bracket, and have installed it, it keeps the factory rear wheel cover *condition of wifey and will let me put a codan 9350 autotune on the back.. the small terlin was just put on to check size and get an idea of how it would look (this antenna will go on as an interim as I search for a 9350!)

      this install was really easy, 30mins of my time - taking my time, i do need to pull the wheel off again when I run the rest of the cables, and add earthing straps etc. will also modify the rear camera bottom plastic guard, as moving the wheel ~10cm has changed the rear view.

      and am still undecided about installing the kaymar rear light / light stand, it may be handy for evening trailer setup on our trip..


      Untitled by asphotos, on Flickr
      **wifey is saying - what have you done to my car!

      Untitled by asphotos, on Flickr

      Untitled by asphotos, on Flickr

      Untitled by asphotos, on Flickr
      Vk3bq
      Junior Member
      Last edited by Vk3bq; 10-10-2012, 07:52 AM.

      Comment


      • #4
        Ulupna island trip last weekend - the creek was dry when we entered our little spot - ~60cm deep when we left, the river rose


        Creek_crossing by asphotos, on Flickr

        Comment


        • #5
          testing a spare old rfds terlin I had in the shed, need a different spring to mount the ham terlin i normally use (its also shorter - 90cm main and 90cm steel whip - vs this 2m one)

          Also doubles as a quick backup battery charger in Melbourne. Just drive along a tram track 10000v dc quick charge!


          Untitled by asphotos, on Flickr


          Untitled by asphotos, on Flickr
          Vk3bq
          Junior Member
          Last edited by Vk3bq; 16-10-2012, 12:45 PM.

          Comment


          • #6
            Originally posted by Vk3bq View Post


            Also doubles as a quick backup battery charger in Melbourne. Just drive along a tram track
            Yes I'd definitely be concerned about driving around the streets with that monster! (nice work but...)
            2004 V6 Grande. BLACK -

            Comment


            • #7
              Originally posted by Vk3bq View Post
              HAHA that reflection is CLASSIC!
              150 VX diesel. Awesome bonnet protector! Monster Rides 3" Susp Lift, 265/70/17 MT MTZ's on Dick Cepek Torques, TJM T13 bar,TG150 Guard, Airtec Snorkel, Lightforce HID's, GME TX3540, CKMTA12 compressor, redarc dual bats, Drawers, fridgy drop slide, Maxtrax, More to come... one day!
              [URL="http://www.pradopoint.com/showthread.php?18807-ages-150-VX-D4D-black"]My Rig Buildup[/URL]

              Comment


              • #8
                Finished part 2 of the dual battery setup. Two power runs to the back of the car.

                Anderson plug for the trailer.


                And power into the rear for fridge etc.
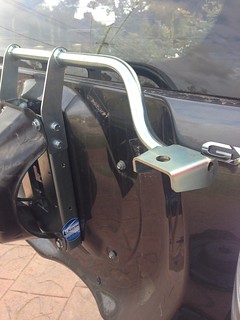
                the loom / panel is removable.

                The messy octopus battery!! Lots of wire now. !!

                Comment


                • #9
                  Nice work on the build up. Great shots too...
                  2012 Pearl White VX, 3.0 Litre D4D Auto, Wynnum 2.5T Tow Bar, OME Lift, TJM Airtech snorkle, TJM diff breathers, Redarc EBRH, Projecta DBC100K, Lightforce XGT, EBC Nudge bar, Custom Recovery Points, TG150, ARB compressor, Pioneer Platform, Kaymar #K7123 /CDQ2195, 697 A/T's, Tin's DC trans cooler, MaxTrax on TraxRax, TJM DBS, Piranha Tray...

                  Comment


                  • #10
                    Originally posted by Ages View Post
                    HAHA that reflection is CLASSIC!
                    Vk3bq,

                    What is the part number for the antenna bracket and approx costs? I think this may work well so that I don't have 2 antennas fitted to the nudge bar again.
                    2012 Pearl White VX, 3.0 Litre D4D Auto, Wynnum 2.5T Tow Bar, OME Lift, TJM Airtech snorkle, TJM diff breathers, Redarc EBRH, Projecta DBC100K, Lightforce XGT, EBC Nudge bar, Custom Recovery Points, TG150, ARB compressor, Pioneer Platform, Kaymar #K7123 /CDQ2195, 697 A/T's, Tin's DC trans cooler, MaxTrax on TraxRax, TJM DBS, Piranha Tray...

                    Comment


                    • #11
                      Originally posted by VeeZeeSS View Post
                      Vk3bq,

                      What is the part number for the antenna bracket and approx costs? I think this may work well so that I don't have 2 antennas fitted to the nudge bar again.
                      Yeah, that Bracket looks quite handy.

                      Especially for those of us without a bull bar to mount the antenna.

                      Im also keen to know the costs involved.

                      Cheers,

                      Jeff
                      [SIZE=3]Jeff[/SIZE]
                      [SIZE=1]2012 | VX | D4D | Auto | Crystal Pearl | LightForce Genesis 50W HID's | ARB UVP | TJM Bar | Tow Bar | Rhino Pioneer Rack | Outback Ideas Points | Airtec Snorkel | Diff Breathers | Uniden UH7760NB UHF | Uniden UH076SX-NB UHF | Bilstein B6 Offroad Shocks | XGS Springs | TG150 | ARB Compressor | Redarc Trailer Brake | Projecta Anderson Plug | Hannibal RTT |[/SIZE]

                      Comment


                      • #12
                        Hi vk, did you run both supplied to the rear via the cable zones under the door scuff panels? I ran one feed in there but I'd be struggling for room to run a second one
                        150 VX diesel. Awesome bonnet protector! Monster Rides 3" Susp Lift, 265/70/17 MT MTZ's on Dick Cepek Torques, TJM T13 bar,TG150 Guard, Airtec Snorkel, Lightforce HID's, GME TX3540, CKMTA12 compressor, redarc dual bats, Drawers, fridgy drop slide, Maxtrax, More to come... one day!
                        [URL="http://www.pradopoint.com/showthread.php?18807-ages-150-VX-D4D-black"]My Rig Buildup[/URL]

                        Comment


                        • #13
                          Ages I got 2x 6 B&S and 2x 8 B&S cables through the passenger scuff panels. I had to cut the ribs to get them to fit, was a tight fit but is like factory again.

                          Comment


                          • #14
                            the rear wheel offset and HF antenna bracker (as well as a rear light I dont yet have) are

                            Toyota Prado 150 – Accessory Bracket for Rear Door

                            Knowing that one of the first things off-roaders do with their new vehicle is put on wider tyres, the boys at Kaymar have developed a combination product to allow a wider tyre to be mounted on the Prado's rear door wheel carrier and also cater for the addition of the most popular - and often first - accessories owners hang off their vehicle.
                            The bracket includes provision for a well braced and carefully shaped arm for securely mounting an HF or UHF aerial out to the right side of the spare wheel.
                            Also built into the bracket is accomodation for the Kaymar telescopic work light.
                            The bracket itself is manufactured from steel plate with laser cut accuracy, robot welded and zinc plated for a durable finish.
                            Fitting of the bracket is a straight forward operation taking only a short time to complete.

                            Part
                            Wheel on door bracket including telescopic light mount, fittings and instructions
                            K7120 RRP $122.00

                            Telescopic work light
                            K0500 RRP $260.00

                            Bracket for HF aerial - to suit K7120 ONLY
                            K7123 RRP $95.00

                            Comment


                            • #15
                              for ages, 6b&s runs from the 2nd battery into the right chassis rail and to the rear for the trailer. no entry into the car.

                              for the fridge/rear of the car, 8b&s runs across the radiator and through the firewall into the passenger footwell. the rear load on this will only ever be low (fridge is max 7amps at 12.5v) my 300w 12-240v inverter if I ever needed it in the back is similar in its requirements, so the smaller wire is fine. that worked well.. question would always be, why do you need multiple runs of the same cable? what load does each have that requires multiple runs?

                              the negative for the rear of the car terminates at a chassis bolt and this is the negative point for the rear. (the negative full return path is a contentious point, i had enough cable and room, so I ran one, and i play HF radios, which needs good earthing (needs earth potential through the car to be as near the same value everywhere to help with noise etc). but most auto elecs would have only run 12v+ to the rear and earthed by that chassis bolt.

                              Comment

                              canli bahis siteleri bahis siteleri ecebet.net
                              mencisport.com
                              antalya escort
                              tsyd.org deneme bonusu veren siteler
                              deneme bonusu veren siteler
                              gaziantep escort
                              gaziantep escort
                              asyabahis maltcasino olabahis olabahis
                              erotik film izle Rus escort gaziantep rus escort
                              atasehir escort tuzla escort
                              sikis sex hatti
                              en iyi casino siteleri
                              deneme bonusu veren siteler
                              casibom
                              deneme bonusu veren siteler
                              deneme bonusu veren siteler
                              betticket istanbulbahis
                              Working...
                              X