 adamr7
 Tweet
Tweet
That comment about the 150s being ugly is...........................off the hook!
-
sigpic2" King Springs, Ironman Foam Cell Shocks. 17x9 Dick Cepek wheels with 275/70/17 Maxxis Bighorn 762S. Ironman Deluxe Bullbar. Lightforce 240 XGT Lights. GME TX3100 UHF. Scanguage II. Drifta Drawers. Wetseat Covers. Toyota. Dual Battery System. MSA Seat Organiser and Table. MSA Wheel Bin. Staun Deflators. Toyota Tow Bar. Ironman Underbody Protection Plates. Waeco CF50. Performance Chip. TJM Airtec Snorkel. Sandgrabba Mats. -
Yeah I agree Adam, taking nothing away from Joeys rig as it is the best 120 around bar none, but the 150's with some kit also look the goods.[b]Rob[/b]
[b]2016 Toyota Hilux SR5 D4D Auto Company Cruiser... [/b].
[url=http://www.pradopoint.com/showthread.php?23866-Hutch-s-2012-150-GXL-V6-petrol-Auto]Hutch's 2012 Build up[/url]
[SIGPIC][/SIGPIC]Comment
-
Yeah fair call, was out of line just personal preference is 120's. But joeys is still the best in my opinion.Originally posted by Hutch View PostComment
-
Here's how I did mineOriginally posted by djnesnah View Post
Step 1 – give the wheel a good wash with hot soapy water
Step 2 – use 800 wet & dry sandpaper to key the surface
Step 3 – ensure the wheel is totally free of scratches/dents, if not keep sanding
Step 4 – give the wheel a good wash with hot soapy water
Step 5 – mask up the wheel as appropriate, if you have a tyre you’ll need to mask up the tyre
Step 6 – clean the wheel with prepsol or wax/grease remover, keep fingers off the cleaned surface
Step 7 – lightly cover the wheel with primer, I used etch prime as I have some bare alloy
Step 8 – wait 1 hour then lightly cover with a colour coat
Step 9 – wait 24 hours and inspect, any drips or marks lightly sand with 800
Step 10 – spray another colour coat, this is the last colour coat so make sure no runs
Step 11 – wait 1 hour then apply a coat of clear gloss, make sure if you use enamel colour use enamel gloss
Step 12 – wait 24 hours then apply another coat of clear gloss
Step 13 – wait 48 hours then take of the masking
Step 14 – marvel at your handiwork
 [url=http://www.myswag.org/index.php?topic=12264]My Prado[/url]
Comment
-
Exactly how i did mine..Although i gave mine 4 coats of gloss for bush preservation!Originally posted by D4D View Post
While i love the feed back on my rig and the hard work has paid off as it is indeed tough and goes like a beast i have taken a shine to a modified 150.
Not for me but once seeing that grey weapon of Hutch i had a re think..
still my next rig in the not to distant future will be a 200 series done in a similar fashion to the look of Pradzilla or i will get a super charged Range rover...
200 is looking good though!
cheers again for the comments lads.
good luck with the wheels ..good to see more are now doing it similar to the scoop....
i have a new guinea pig mod coming soon!
cheers joeyFeatured - issue 140 Australian 4wd Action.
-issue 52 Modified 4wds .
Locked ,Lifted, boosted Brut---"Pradzilla".
[IMG]http://i236.photobucket.com/albums/ff268/bigfryy/_0481154045-2.jpg[/IMG]Comment
-
Man thanks a lot d4d , much appreciated, will give it ago in a couple of weeks. Wil posts pics of my rig once it is doneOriginally posted by D4D View PostComment
-
New Mod for the rig---Just ordered a new Trackabout Safari SV Dakar Camper Trailer..
Cant wait !! Going to look good hanging off the back of the rig...
cheers JoeyFeatured - issue 140 Australian 4wd Action.
-issue 52 Modified 4wds .
Locked ,Lifted, boosted Brut---"Pradzilla".
[IMG]http://i236.photobucket.com/albums/ff268/bigfryy/_0481154045-2.jpg[/IMG]Comment
-
Nice work joey! Got any more pics from the shoot with 4WD Action that you are allowed to post?NOW FOR SALE!!! - 2004 Silver GXL 3lt 4spd Auto - ARB Bullbar, Safari Snorkel, Redarc Dual Battery System, Cooper ST MAXX, Dark Tint, IPF900XS spots, Raised Bilstein/Kings Suspension/Firestone Airbags, Autosafe Cargo Barrier, Sandgrabbers, Rola Roof Rack Stuff, Insect Screen, Dust/Wind Deflectors, Sheepskin/Black Duck Seatcovers, GME TX3510, ARB underbonnet compressor, Allied Hammer Rims, ARB UVP, [url="http://www.pradopoint.com/showthread.php?18043-Rock-sliders-steel-side-steps"]AJ Sliders[/url]Comment
-
I do mate ...As soon as i get back to Oz i will get them up for you..Originally posted by Madkore View Post
cheers JoeyFeatured - issue 140 Australian 4wd Action.
-issue 52 Modified 4wds .
Locked ,Lifted, boosted Brut---"Pradzilla".
[IMG]http://i236.photobucket.com/albums/ff268/bigfryy/_0481154045-2.jpg[/IMG]Comment
-
Just a quick up date....
bought 8 of these 17inch flames ..i looked at them 18months ago but ended up putting money into a rod and reel that cost way more..
3 are for the camper which are pictured below that were just picked up and the 5 i have will be sent to Cairns and be ready when i get back to Oz..
Fresh from the dealer and heading to Trackabout Offroad Camers.
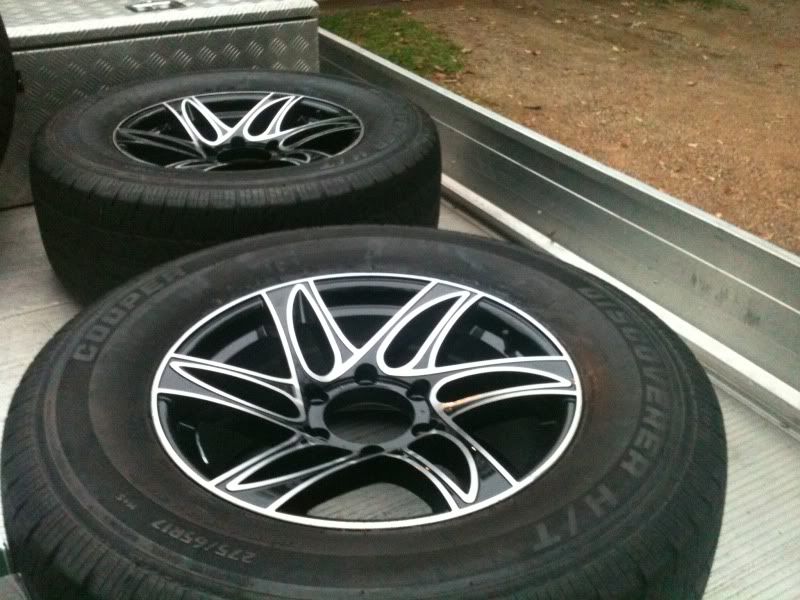
heres a clear pic from the net..
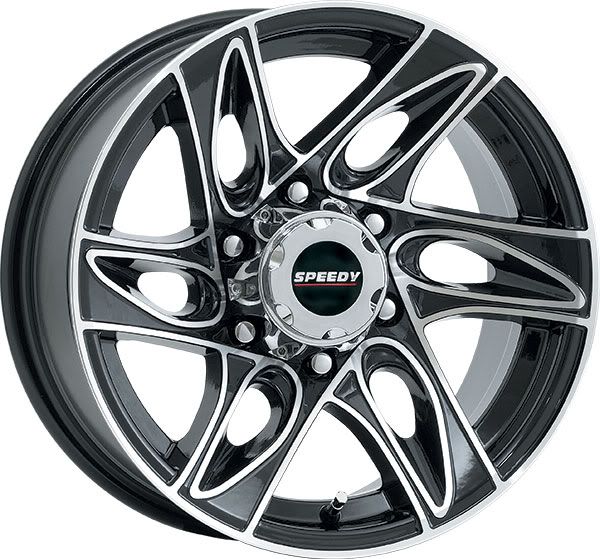
so now i will have 8 17 inch flames all on cooper stt 265/70/17s ...
i also have these currently being shipped for the rig and camper.
will post pics of the gear fitted when i get back!
cheers JoeyFeatured - issue 140 Australian 4wd Action.
-issue 52 Modified 4wds .
Locked ,Lifted, boosted Brut---"Pradzilla".
[IMG]http://i236.photobucket.com/albums/ff268/bigfryy/_0481154045-2.jpg[/IMG]Comment
-
Hey Joey,
Should have known you'd be on PP! Got to be proud of your work and deserve all the praise you get.
P.S. Still keen for a wheel when your about.
Cheers,
DustyComment
-
for sure mate ...
pm me your details...
JoeyFeatured - issue 140 Australian 4wd Action.
-issue 52 Modified 4wds .
Locked ,Lifted, boosted Brut---"Pradzilla".
[IMG]http://i236.photobucket.com/albums/ff268/bigfryy/_0481154045-2.jpg[/IMG]Comment
-
PM sent
Cheers,
DustyComment
-
Hey Joey absolutely love Pradzilla and it is my main source of inspiration for my build up. Quick question I love the 3 spotties across the front but where have you positioned the winch control box as a winch is essential down here for the high countryComment
-
Hi DRJ,Originally posted by Drj View Post
hi have placed the winch control box at the rear upper right hand side of the engine bay where it will be dry.
i have placed the winch plug inside the cab.
If you troll through the build you can see both fit outs.
cheers.
JoeyFeatured - issue 140 Australian 4wd Action.
-issue 52 Modified 4wds .
Locked ,Lifted, boosted Brut---"Pradzilla".
[IMG]http://i236.photobucket.com/albums/ff268/bigfryy/_0481154045-2.jpg[/IMG]Comment
Comment